 QQ咨询
QQ咨询 阿里旺旺
阿里旺旺 #skype#
在CentOS 6上部署Shadowsocks Server
参考资料:
http://www.shadowsocks.org
背景介绍:
相对于VPN而言,搭建一个Shadowsocks服务,然后通过浏览器代理的方式来使用,要方便很多。
它的原理跟SSH Tunnel类似,就是通过Shadowsocks的服务端与其专用的Shadowsocks客户端建立起一个加密的隧道,然后Shadowsocks客户端会在本地监听一个端口,默认为1080;所有经过这个本地端口的数据都会通过这个加密隧道。
相关配置:
OS: CentOS 6.4 x86_64 Minimal
1. 安装Shadowsocks Server
# pip install shadowsocks
2. 配置/etc/shadowsocks.json
# vim /etc/shadowsocks.json
{
  "server": "0.0.0.0",
  "server_port": 443,
  "local_address": "127.0.0.1",
  "local_port": 1080,
  "password": "shadowsockspass",
  "timeout": 600,
  "method": "aes-256-cfb",
  "fast_open": false,
  "workers": 1
}
注解:在以上配置文件中,
定义了监听的服务器地址为任意地址:”server”: “0.0.0.0”,
定义了监听的服务器端口为443:”server_port”: 443,
定义了客户端本地的监听地址为127.0.0.1:”local_address”: “127.0.0.1”,
定义了客户端本地的监听端口为1080:”local_port”: 1080,
定义了密码为shadowsockspass:”password”: “shadowsockspass”,
定义了连接超时的时间为600秒:”timeout”: 600,
定义了加密的方式为aes-256-cfb:”method”: “aes-256-cfb”,
默认关闭了fast_open属性:”fast_open”: false,
定义了进程数为1:”workers”: 1
3. 配置/etc/sysctl.conf,新增如下配置:
# vim /etc/sysctl.conf
# For shadowsocks
fs.file-max = 65535
net.core.rmem_max = 67108864
net.core.wmem_max = 67108864
net.ipv4.tcp_fin_timeout = 30
net.ipv4.tcp_keepalive_time = 1200
net.ipv4.tcp_max_syn_backlog = 8192
net.ipv4.tcp_max_tw_buckets = 5120
net.ipv4.tcp_mem = 25600 51200 102400
net.ipv4.tcp_rmem = 4096 87380 67108864
net.ipv4.tcp_wmem = 4096 65536 67108864
net.ipv4.tcp_mtu_probing = 1
net.ipv4.tcp_congestion_control = hybla
# sysctl -p
4. 启动Shadowsocks服务
# ssserver -c /etc/shadowsocks.json -d start
# netstat -lntp | grep 443
tcp 0 0 0.0.0.0:443 0.0.0.0:* LISTEN 11037/python
5. 下载Shadowsocks客户端
Windows:https://github.com/shadowsocks/shadowsocks-csharp/releases/download/2.5.6/Shadowsocks-win-2.5.6.zip
Mac OS X:https://github.com/shadowsocks/shadowsocks-iOS/releases/download/2.6.3/ShadowsocksX-2.6.3.dmg
6. 配置客户端
创建服务器连接,输入:
服务器地址,如:heylinux.com
端口:443
加密方式:aes-256-cfb
密码:shadowsockspass
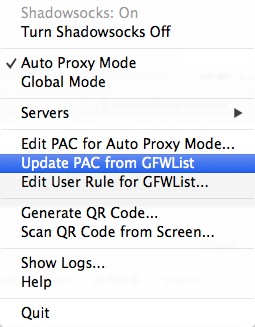
启动客户端并一直保持在启动状态,默认选择Auto Proxy Mode,并执行一次Update PAC from GFWList,如下图所示:
7. 配置浏览器插件
安装插件Proxy SwitchySharp:https://chrome.google.com/webstore/detail/dpplabbmogkhghncfbfdeeokoefdjegm
配置插件,如下图所示:
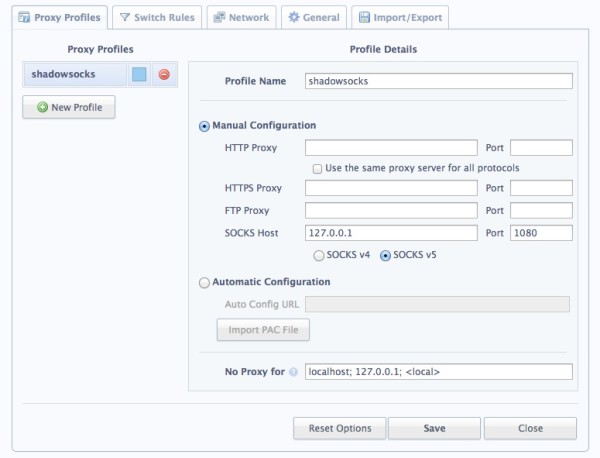
启用刚刚配置好的Proxy:shadowsocks
8. 结束